Showing posts with label Tutorial. Show all posts

Sunday, 20 December 2009

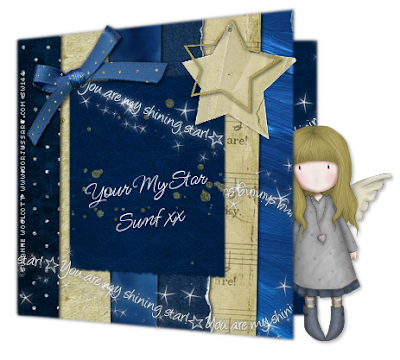
Little bit of magic


Artwork suzanne woolcot here
Scrapkits used in tagsLine Designs:: (ptu) FantasyJofia :: (ptu) Under the apple tree I am You (ftu) :: Moninda Scrap Birdie Song (FTU) Urbanfairytales


This tag is intended to bring out your imagination
one of those that each time you make it its gonna be a little different
then any other tag you see.Why because it comes from you
.Choose your scrapkit
Look for something with a brushed effect or swirls, Flowing leaves or trailing hearts
anything infact that has alot of detail Things that stand out on a background.

Open a new image 500 by 500
Floodfill with colour of choice ,
This will be deleted later
Open your brushed layer/swirlsResize so it fits well within the confines of your image
(large scraps by at least 20%)& use the deform tool to help resize more
add a drop shadowChoose to place the larger shapes/Elements first
This will give you a better idea of where you want your smaller items to either
from behind or in front
To move inbetween layers in your layer palette highlight the piece you wish to moveand drag either up or down.Place the smaller bits and build up the tag untill your happy with the outcome.Add a drop shadow to each element to make it stand out from the other layers.

Choose a tube that compliments the colours
Place it offset to the cluster or inbetween layers.
If you want the tag a little smaller use the deform tool or the resizer crop away any excess surounding the tag
dont forget your copyright and
X out the coloured back and save as PNG

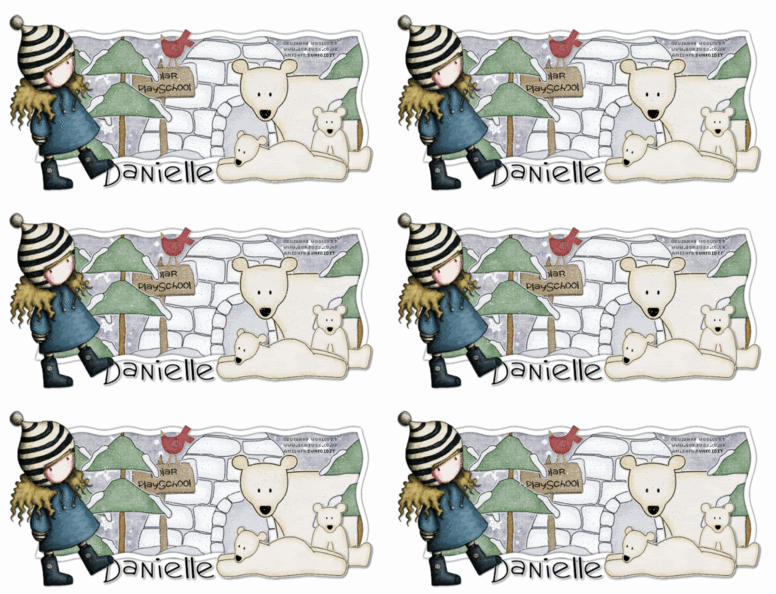
Polar Playground


Artwork©Suzanne WoolcottYou can purchase suzannes work at gorjuss art Not to be used without a licence to do so.ScrapkitPolar Pals by DMK Designs Get it Here Animation Here

Open a new image 800 by 600
With your selection tool draw out a rectangle
Length Roughly 3/4 of the size of your Working image
Floodfill with white
Selections > Modify > Contract by 20 > Hit delete
Selections > Select None
Layers > Duplicate Click back to the original raster
Adjust > Hue & saturation > Hugh & SaturationLightness > -100

so the original is now black.
Adjust > Blur > gaussian Blur 1Merge visableEffects > Distortion effects > wave Horizontal Amplitude 1 Horizontal
Wavelength 41Vertical
Amplitude 1Vertical Wavelength 13
OK
Image > Resize by 80%
Magic wand inside the frame you have made
Selections > Modify > Expand by 5Copy and paste a paper of choice as a new layer
Hit delete & drag that layer beneath your frame in your layer palette.
making your background scene

Resize the elements to your liking and then paste as new layers
Paste then in the order you wish them to show
i pasted the igloo , then the Wooden sign, trees then the polar bears.
After each element add hit delete to remove excess.
Once all your elements are added Selections > Select None


Click on the Wooden sign and add some text.
click onto the top layer in your layer palette
Start to add your Tube and elements that are outside of the framework.
Once happy add your copyrights & name
.At this point crop to remove excess white around the tag
Now x out all the top layers in your layer palette one by one untill you have hidden all above the frame & the frame.
Now merge visable what is left showingcopy and paste in AS as new animation

Hit CTRL L 19 times
So you now have 20 frames
Go back to Psp X out the bottom Layer and unhide the top layers

MergeVisble Copy & Take to AS paste as new animation
Hit CTRL L 19 timesSo you now have 20 frames again
Edit > Select all
Minimise these frames

Now open the snowfal animation
Edit > Select all
Drag the snow from the first frame across to your background scene
Place Inside the perimeter of your scene
Go back to the empty animation frames
Edit > Undo DragAnd Drag once more to fill the rest of your scene.
Now maximise your frame layers

From the first layer drag across to your scene frames
Place accordignly
Optimise wizard and save as


©Tutorial by Sunf of sunfindulgence any resemblence to any other tut is coincidental

Friday, 10 April 2009

LO & 2 Tutorials

Started off making a tag and ended up making a Lo lol, yes obsessed , my hubby is raising an eyebrow as i type lmao


The tag above was made for me by MzPimptress ty matey, She has done a Tutorial called Our Meadow Here . MzP is also a huge twilight fan and has some fabulous bits on her blog here.

This next tag above is one from Kirsty fabulous tut writer at Kirstys Keepsakes,
This is from a tutorial called Be Safe
Thankyou for my wicked tag Kirsty .
The tag is actually animated unfortunately blogger is not been kind to me today and not letting it post correctly .

Friday, 27 February 2009

Using Masks Tutorial

Ok had a couple of questions on masks this week so her goes the explanation lol. The masks and everything i make on this blog is for use in Paint Shop Pro. To use in paint shop pro
follow these instructions
Place the mask in a folder in documents (name it mask1)or something of your choice.
Open psp, Open a new image and go to
File >Prefrences > File Locations >
A pop up box will appear, In the left column you will see a list.
Find masks > click then click Browse
Search in documents for Mask1 folder and add > OK
Now once you use a paper or floodfilled image go to
layers > Load/Save mask > Load mask from disc
Find the mask you want to use and apply
Once applied merge group
***
Im not sure if they can be used in PS as thats not a program i have worked with.
I hope this is of some help to those who were unsure what to do with them
sunf x

Friday, 20 February 2009

Tut By Stevie Using Clover


Beautiful tut made with my freebie kit
Thankyou Stevie i feel very honoured gal.

Friday, 21 November 2008

Christmas Card Greetings


Scrapkit I used is from Lights , Camera, Actions

Another version made with Kristin Aagard Freebie

Artwork© Suzanne WoolcottPurchase Suzannes work at Gorjuss Art Not to be used without a licence.Scrapkit Sues Christmas Wish by Lights, Camera, Actions Get Here

Open a new image 800 by 600Floodfill with whiteWith your selection tool set on rectangle draw out a card shape
New raster layer > Floodfill with light gray #C0C0C0Selections > Modify > Contract by 82Hit delete and select none
Click onto the deform tool
Holding down the shift keyDrag downwards slightly the left top
upwards slightly the bottom left nodeYour card should now be sat on an angle.Now with your selection tool again
Draw out a square from the top left of the carddown to the bottom left and across
go slightly further across then the width of the card
New raster layer floodfill with #808080Selections >
Select nonethis is the back of your card
Drag this layer down underneath the front of the cardin your layer palette.
click on the top layer
Magic wand inside the card
Paste a paper of choiceselections >
Invert and hit deleteSelect none
you may find that you get a serated edge on the angle
to clean this up use your freehand selection tool set on point to pointdraw just slightly over the edge and hit delete


Once done add a drop shadowX out the template layer for the front.
Now the back of the card againCXlick on it and Magic wand insideFill with a paper of choiceSelections > Invert and hit deleteselect none and add a drop shadow.X out the template layer for the back.
Click back to the top layerWe going to pretty the card up now so choose some elements you want to add Remember putting the card on an angleuse the same effect to the elements you addafter each, add a drop shadow #000000Add some wording on the cardremember to set at an angle.Once done on the outsideclick back to the Back of the cardAdd an element inside the cardyou may want to lower the opacity slightly.Choose your tube, resize with the deform tool if nessecery.paste as a new layer and add a drop shadow.set so she is peeking out from inside the card.

Crop around the card to remove excess border on tagResize if you wish to(i generally resize by 80%)add your copyrightX out the white background layerand save as png


©Tutorial by Sunf of sunfindulgence any resemblence to any other tut is coincidental

Thursday, 20 November 2008

Love SOS Tutorial

Another one from Jessicas gorjuss kits
This ones made with Vicky and i love all the eclectic bits n bobs in it
Artwork©Alayna MagnanYou can purchase her work at CILM Not to be used without a licence.Scrapkit Vicky by Scraps By Jessica

Open a new working image 800 by 600Floodfill with whiteOpen the weathered frame and resize by 70%Paste onto the working imageadd a drop shadow #404040With your selection tool set on rectangledraw a square around the oval part of the framePaste a paper of choiceSelections> Invert and hit deleteSelections > Select noneclick back to the frame layer
Now paste your tube of choiceAdd ad rop shadow same as beforeposition the tube in the middleas we will have her emerging from the frame.Duplicate the tube and drag the duplicate beneath your framedo this in your layer paletteclick back to the top tubeNow depending on your tube usedWith your erase tool set on a small brushstart removing overlaps from the bottomso we give the effect of been in the frame.But things such as hair stay on the outside
Click back to the frame layerHeres where qe build up some elements around the frameUse your deform tool to get the optimal size for your tagPaste each element as a new layer and add a drop shadow to eachtry dragging them up and down in your layer paletteto fit them in and behind other elements.remeber the layer your working on at the time is highlighted in the pallettesimplt left click and drap up or down.For a couple of the elements i used, I used the colour change toolSimply click in the foreground material boxpick a colour with the dropper from your tubeclick onto your colour change tooland colour the elements to suit.Drag stuff beneath the frame also.
Once you have a good build up of elements and your happyResize the tag to 80%Add your copyrightYour wording and name
X out the white Background
and save as png


©Tutorial by Sunf of sunfindulgence any resemblence to any other tut is coincidental

Wednesday, 19 November 2008

Beautiful

Kit is called Rachel
See Scraps by Jessica for details
artwork suzanne woolcotthttp://www.gorjuss.co.uk/
Cloud used with permission
Do not use supplies without permission in other tutorials
Supplies Here
Open a new Image 700 by 500Floodfill with white.
Place your Gazebo as a new raster,Resize your tube to fit inside the Atrium comfortably.Add another Atriumabove your tube then in the doorway section.Take your selection tool set on rectangle, draw a rectangle,inside the doorway and hit delete.Select None.This will make the tube look like certain parts are inside the Atrium.See tag for reference ( see leg and hands)
Start to build up your elements.Place the tree in the background of your tag,Use your layer palette to move the layers down.Colourize the tree to take away the darkness.
Add the ivy as new raster layer.Duplicate and flip.The duplicate again & mirror image.Place the duplicates in the middle of the atrium ,then drag behind in your layer palette.See tag for placement reference.
Add the clouds and drag down to the bottom of your layer palette.With your deform too stretch across the back of the atrium.Click back onto your move tool.
Place the leaf Tube as a new raster layer.Duplicate a few times and move about the tag.Take your Perspective correction tool and use it to pull your leaves at differnt angles.Do this in smal amounts, as to large it distorts too much.go with what makes you happy there is no exactnessto the way i did it. Try to draw the leaves backwards,so it creates a floor for your tag.If you find it has gone to far .Go to edit > Undo.
Once your happy with the placement of all your elements.Add copyright & Name.
Merge all & Crop to Size.Save as
©Tutorial by Sunf of sunfindulgence any resemblence to any other tut is coincidental

Friday, 7 November 2008

Veronicas Wish

First tut for site this Month, Have been so busy lately, it's taken me a while to get me self back in the swing lol. Anyways this tags made with a kit called Veronica.
Of course its by one of my fav kit makers Scraps by Jessica
Enjoy xx
Artwork©Zindy NielsonYou can purchase Zindys work at ZindyZone Not to be used without a licence to do so.Scrap kit Veronica by Scraps by Jessica
Open a new image 800 by 600Floodfill with whiteOpen the textured frameresize by 90%paste onto working imageadd a dark drop shadowOpen the white frameResize by 80%Paste onto working image on top of the textured frameOpen stalk 1 & resize by 80%paste onto working image add a drop shadow.Place just in the frame (outside of)
Open buckle 2with the deform tool resize it downand rotate it slightly.Paste in the top right hand corneron the framewith the erase tool take away a small piecethats over the button.Now with the selection tool set on rectangleDraw a square within the boundry of the white frameOpen a paper of choice and paste as a new layerDrag this layer beneath the framesin your layer paletteSelections > Invert & hit deleteOpen your tube of choicepaste as a new layer & place to your likinghit delete againNow were going to build up some elements on the outside of the frame so click onto your top layerin your layer paletteOpen some flowers/Elements of choiceresize with the deform tool if neceserrydon't forget to add drop shadows to each new addTry colurizing down to grey a couple of the elements you addtoo add some contrast between the colours.Open the large bow and roate it left resize down with the deform tooland paste to working imgeadjust the size to suit.Crop around the tag and resize to your likingAdd copyrights and nameFor the namechoose the two prodominent colours in your tagbrighter colour on the outersideStoke 2 on text widthRotate it and add a drop shadowX out your white background and save as PNG


©Tutorial by Sunf of sunfindulgence any resemblence to any other tut is coincidental

Wednesday, 29 October 2008

Belles Ball


Artwork©PinUpToonsYou can purchase Rions work at CILM Not to be used without a licence to do so.Scrap kit Hope by Scraps By Jessica
Mask117 by WeeScottsLass
Template Here
Open the TemplateErase the the identity layerClick onto the main template.With your magic wand click inside the white area.Selections > Modify > Expand by 2 & InvertPaste a paper of choice & Hit deleteSelections > Select noneClick back on to the main templateRepeat this process in each column ofcolour untill the template is full.
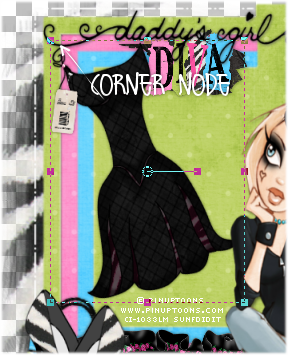
Click onto the black background layerOpen Paper of choice(resize if neceserry)Layers > Load/save mask > Load from disc > WSL Mask117 >OkMerge group and paste onto working image.Use the deform tool to size it to fit your tag correctly.Click onto the move tooland then the top layer in your layer palette.From now onIts a matter of using the deform tool to resize elements to your likingEach element you add, give a drop shadowTo use the deform toolPull the corner node inward towards the middle to make smallerPull it out wards to make longer or biggerUse the Red node in the middle to rotate an elementSee diagram for Deform tool/Corner node.

Once your finished adding your elementsResize the tag by 80%Add your copyrightsClick on the Label then add your nameX out the black Bg and save as PNG


©Tutorial by Sunf of sunfindulgence any resemblence to any other tut is coincidental

Wednesday, 22 October 2008

Snow Princess


This is an animated tag

Fabulous Free kit of the same name by Joanne of


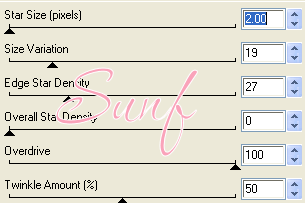
Artwork Suzanne WoolcottYou can purchase Suzannes work at Gorjuss art Not to be used without a licence.Scrtapkit Snow Princess by Lights, Camera, Action Mask17 by me at Urban Fairytales Mask 25 by WeeScottsLass Plugin Xenofex2
Open a new image 800 by 600Floodfill with white
Open the Sign post & resizeby 20% smartsize.Paste onto your working image as a new layeradd a light drop shadow #808080Click on your text tool and write out yourpost signs, Angle while still in vector form each one.Once all 4 are writen, convert to raster.X out the white background for a secondand merge visible.Click onto the white layer and un-x
Open a paper of choice , resize by 20%Layers > Load/save mask > Load mask from disc > Uf mask17Merge group & click on the deform tooltake the size down slightly and paste onto your working imageArrange the size to suit your tagadd light drop shadow Click back to the white layer againOpen a 2nd paper of choice , resize by 20%Layers > Load/save mask > Load mask from disc > WSL Mask25Merge group & click on the deform tooltake the size down slightly and paste onto your working imageArange the size to suit your tagadd light drop shadow


Open the snow princess and resize by 20%You will need to size again with your deform tool paste onto the working image and drag the layer above the sign post.give her a drop shadow, same as the other elements.Place to the left of the signpost
Click back to the Doodled mask LayerClick inside the flowered frame with your magic wandSelections > Modify > Expand by 7 > InvertResize a paper and paste as a new layerHit delete and drag this paper layer beneath the doodle mask layerNow choose your tubePaste again as a new layerPlace and hit deleteSelect none.
Open a snowflakeresize by 20% and click once more on the deform toolresize just a litle more and paste as a new layeradd a drop shadowlayers > Duplicate and move to a nother spot on the tagrepeat this a few timesseee tag for reference.
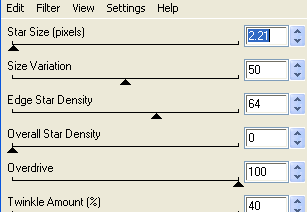
Now crop around the tag to remove excess whiteAdd your copyright & nameNow click onto the doodle mask layer againEffects > Xero > ConstalationSee preview for settings


Ok & Merge allCopy and take to AS
Back to pspEdit > Undo merge > Undo select None > Undo constalationEffects > Constalation> hit random seedOk > Select none > merge all > Copytake to AS & Hit CTRL L once
Optimise wizard and save as

Serene Autumn

Artwork Suzanne Woolcottpurchase at gorjussart Not to be used without a licenceMy tube was purchased at amiImages "Bleu comme une orange" by Images by Fran

Open a new working image 800 by 600Floodfill with whiteOpen the Orange Deco5 (overlay)Resize this by 50% smartsizeCopy and pase as a new layer onto your working imageOpen deco1 resize by 20%Paste to the right of the tag adda light drop shadow to each element addedOpen Abres(trees) resize by 20%Lower the opacity of this layer to 28%Open deco7 & 3resize these by 20% alsobefore you paste themImages > rotate clockwisePlace to your likingOpen your tube resize to your likingpaste as a new layerYou may want to move it between some of the layersTo do this look for the higlighted layer in yourlayer palette, left click and drag down.Take one of the leaves and resize by 20%Write out your name, with a colour from the scrapsadd the leaf somewhere to the name see tag for reference
Resize your tag if you wish to at this pointadd your copyright X out the white layerand save as png


©Tutorial by Sunf of sunfindulgence any resemblence to any other tut is coincidental

Tuesday, 21 October 2008

Happy Holidays

©PinUpToonsYou can purchase Rions work at CILM Not to be used without a licence.Scrapkit Country Christmas by BoundlessBlissScraps Mask34 by me at Urban Fairytales
Open the template Magic wand inside the gray innerSelections > Invertpaste a paper of choice and hit deleteNow paste your tubePosition and hit delete againSelect none Open the Happy Holidays tagclick on the deform toolresize and place on an anglePlace the tag to the left of the of the frameadd a dark drop shadowClick on the brush layer of the templateAdjust >Colourise > Hue & saturationTake the lightness down to 22%so the brush layer becomes GrayClick on the material palette With the tool dropper, take a gold colour from the tube/kitNow click on the Change to target toolAnd recolour your brush layer to goldad a drop shadowOpen the star tag and resizewith the deform toolPlace again to the left ontop of the brush layeradd a drop shadowMerge layers visibleCopy & paste onto a new working imagesize 800 by 600New raster layer, Floodfill and drag this beneathyour picture layerOpen a new paperLayers > Load/save mask > Load mask from disc >Ufmask 34 > OkClick the deform tool and make the paper layer more elongatedCopy & paste onto your working imageUse the deform tool to size it to meet your requirementsadd a drop shadow when your happyOpen one of the cluster flowersImage > Rotate clockwiseCopy and paste onto the working imagePlace behind the frameSee tag for reference.Resize the tag if you wish too add your copyrightcrop around the whiteX out the white bg and save as png


©Tutorial by Sunf of sunfindulgence any resemblence to any other tut is coincidental

Thursday, 16 October 2008

100%

100% Here


Kit Lacys Naught & Nice By Jessica


Artwork PinUpToonsYou can purchase Rions work at CILM Not to be used without a licence.Scrapkit Laceys Naughty And Nice Creation at Scraps by Jessica
Purchase on Jessicas BlogMask13 by me at Urban Fairytales Xenofex Constilation
Open a new image 800 by 600Floodfill with whitePaste the circular frame as a new layerAdd a Drop shadow 2/2/50/5.00Magic wand inside the frameLayers > Modify > expand by 4Paste your paper (i used the circled for animation effect)Selections > Invert & Hit deleteSelect NoneNow paste your tubePosition in the center of the circleAdd a dark drop shadowsame as beforeErase tool, Just remove anything peeking out underneath the frame at the bottomlayers > DuplicateDrag the copy to the top in your layer paletteThis will be the highlighted layerleft click >Drag upAgain erase any excess at the bottom so she is popping ouy of the frame
Open the bannerPaste as a new layerwith the deform toolrotate so its at an angle like mine.Resize slighlty to hug the frameDo this by dragging the corner node inwards.add a drop shadow again
Add the lil doodleresize if you wish tooadd a drop shadowNow click back on the white layerPaste the word art and position so only the doodle bit is showinglayers > DuplicateImage >Mirror Image > FlipNow open another paperLayers > Load/savemask > Load mask from discChoose UFMask13 > Ok Merge groupCopy and paste onto the working imageResize with the deform tool to suit
You can resize the whole tag at this point if you wish toAdd your name and copyrightNow click back onto the inner paper inside the frameEffects > Xenofex > ConstalationSee preview for settings

ApplyMerge all and copyGo to AS paste as a new animation
Back in Psp Edit > Undo Merge > Undo pluginEffects Constalation > Random seedMerge all and copytake to ASHIT CTRL L once
Back in Psp Edit > Undo Merge > Undo pluginEffects Constalation > Random seedMerge all and copytake to ASHIT CTRL L once Optimise wizard and save as


©Tutorial by Sunf of sunfindulgence any resemblence to any other tut is coincidental


Tuesday, 7 October 2008

Huggable

Artwork Suzanne WoolcottYou can purchase at Gorjuss art Not to be used without a licence.ScrapKit Sues Creations By Jessica Can be purchased at Taggers scraps Mask 16 by me at Urban fairytales

Open a new image 800 by 600Floodfill with whiteOpen frame 4 and resize by 80%Copy & Paste onto the working image.Select your freehand selection toolset on point to pointDraw around the inner frameuntill all sides meet and double clickYou will now have the marching ants active.Open an image of choice and paste as a new layerSelections > Invert > Hit delete > Select NoneDrag the image below your frame in the layer paletteLeft click and dragX out the whit bgand merge visibleUnhide the white BgClick on the deform tooland slightly resize the merged layerset on a slight angle alsowhen done click onto the move toolclick onto the white
Open the Journal3Copy and paste as a new layeradd a light drop shadowI added another ribbon at this point just under the hanging frameClick on ti#he top frame in your layer paletteresize and add some flowers at the bottom of the journalResize your tube and pasteadd a light drop shadowclick back to the white againOpen a paper of choice and apply maskMerge group > paste as a new layerresize with the deform tool to suit your tag
I also added a fan to the top right corneruse the same resizing method so you get it how you want it.Resize the whole tag by 80%Crop around the edgesadd copyright and text at this pointx out the white layer and save as png


©Tutorial by Sunf of sunfindulgence any resemblence to any other tut is coincidental

New Mask27 & Tut

Tutorial to go with It's My Party
This is a simple animated Tutorial a real quickie
No Preview as im having problems uploading here this morning

Monday, 6 October 2008

Mask 26 & Out of Blooms Tutorial

New Tutorial to go with the mask
Out of Blooms
Download Mask 26 Here
©Suzanne Woolcott You can purchase Suzannes work at Gorjuss Art
Not to be used with out a licence to do soScraps Build a bloom 2 by Christina Renee Designs Mask 26 by me @ Urban Fairytales

Open a new layer 800 by 700Floodfill with whiteOpen a green paper of choice or anew raster floodfilled with greenLoad/save mask > Load mask from disc > Choose Ufmask26 and apply/okMerge group and copy and paste(paper option) onto your working image(you may also need to resize depending on paper size)Use your deform tool to do this.add a drop shadow the same colour as the paper or fill
Time to start adding a few leaves and vinessome peices will not need to be resized from this kit others like the large flower will do.for smaller peices use the deform tool for the larger flower resize by 20%Now add the large flower add a drop shadow to each of the elements addedNow add your tube, you will need to resize slighlyso the tube is small enough to stand in the floweradd a drop shadow againNow click back to the large flowerLayers > DuplicateDrag the duplicate above the tubeNow carefully erase the middle petal so it gives the impression the tube is half in /halfout of the flowerresize the whole thing by 80%
add your copyright and name


©Tutorial by Sunf of sunfindulgence any resemblence to any other tut is coincidental

Thursday, 2 October 2008

Gorjuss Family Album

This is made with a fabulous free scrap from Montis Pixel playground
doesn't she rock!!

In Memory of Carl

A dedication to my Bro Carl
have wanted to do this for a long time but never been able to sit and do it till now.
He was much loved by the family, one of thos people who everyone loved.
a night out would never be the same after you had one out with this fella, ya could garuntee something hilarious would happen, He'd either end getting took home in a wheel barrow or try chatting up a statue pmsl. Something always that would have us rolling in the isles.
Anyways I miss him and well this is for him.

Monday, 29 September 2008

Black Versus Pink

Had fun with this one enjoy
Black V Pink download here
Artwork Martin AbelYou can purchase Martins work at CILM Not to be used without a licence.Animation by Drabe hereAll other supplies Black V Pink on freebiesDownload at Urban Fairytales

Open a new image 800 by 600Floodfill with white
Open the frame and paste as a new layeradd a drop shadow2/2/50/5.00Magic wand inside the frameSelections > Modify > Expand by 5> selections > InvertPaste a paper of choice & Hit deleteDrag this layer beneath your frameSelect nonePaste your tube of choiceadd a drop shadow3/3 /50/5.00Click back to the white layerOpen the Doodle framePaste as a new layerPosition to your likingLayers > DuplicateOn the original doodle layerAdjust > Blur > Gaussian Blur 6 >Resize tag by 80%Add your copyright and nameMerge all layersCopy and paste in AS as a new animationHit CTRL L 7 timesso you have a total of 8 framesOpen the animationEdit select allDrag from frame one across to your tagpositionon tagGo back to the animationEdit > Undo dragDrag across to your tag againand place once moresee tag for reference
Optimise wizard and save as


©Tutorial by Sunf of sunfindulgence any resemblence to any other tut is coincidental